Between March 2020 and January 2022, 2.5 million new stores opened on Shopify. That’s a lot of new entrepreneurs entering the world of ecommerce!
Launching your own business is exciting. But it comes with the responsibility of filing your own self-employment taxes. And if you’re relying on a third-party platform like Shopify to run your business, you might be worried it’s going to complicate that process even more.
Don’t worry — it won’t. For the most part, Shopify’s main role in your taxes is to send you a tax form called the 1099-K (and that’s if you qualify for it).
In this guide, we’ll walk you through how to get that form and what to do with it. We’ll also go over how to save money on your taxes from your Shopify store.
First, though, let’s talk about the basics.
Does Shopify report to the IRS?
Yes, Shopify reports most account owners' business transactions to the IRS every year, in a form called the 1099-K. (This is the same form you'd get if your customers or clients pay you with a credit card.)
As a seller, you’ll receive a matching 1099-K from Shopify. You can use it to help you figure out your gross income for the year — something you’ll want when you file your taxes.
However, Shopify doesn’t report every merchant’s transactions to the IRS. Let’s cover who does and doesn’t get a 1099-K for their Shopify income.
Who receives a 1099-K from Shopify?
For the 2023 tax year, your online business will get a 1099-K from Shopify f it did both of the following things through the platform:
- ✓ Earn at least $20,000
- ✓ Log at least 200 orders
If you own multiple online stores and make at least $20,000 per store, you’ll get a separate 1099-K for each one.
If these thresholds sound high to you, that's because there's been a rule change from the IRS.
This threshold to receive a 1099-K was supposed to change to $600 (across any number of transactions) for the 2023 tax year, but the IRS delayed that change, so the above rules still apply.
For the 2024 tax year, the threshold is set to change to $5,000. This is intended as a "phase-in" to the eventual $600 threshold, which the IRS still plans to implement at some point.
How to get your 1099-K from Shopify
There are two ways to get your Shopify 1099-K.
By email
If you qualify for the form, Shopify will email you a copy by January 31.
From your dashboard
You can also view and download the form from your Shopify dashboard.
Here’s how:
- Log in to your Shopify account
- Go to the Payments section
- Click on Documents in the top-left corner
What to do if you don’t receive a Shopify 1099-K
Whether or not you get a Form 1099-K from Shopify, you’ll likely still have to report your earnings to the IRS. Luckily, you don’t need a 1099-K to do that.
That said, if you do qualify, you might still want your form for your own recordkeeping.
Here’s what to do if Shopify’s 1099-K never makes it to you.
If you earned at least $600 through Shopify
Maybe you believe you should have gotten a 1099-K form, but you’re not seeing one available in your email inbox or dashboard.
You have a few options. You can:
- Chat with Shopify support
- Email Shopify support
- Figure out the total amount you earned through Shopify on your own
Want to go with the last option and handle things independently? You can follow the same steps as someone who doesn’t qualify for a 1099-K, below.
If you earned less than $600 through Shopify
The IRS will expect you to file self-employment taxes as long as you earn at least $400 through your business. (That’s after you subtract any write-offs, something we’ll talk about below.)
So what do you do if you have to file, but didn’t earn $600 through Shopify? You won’t get 1099-K, but don’t you need one to add up your income when you file?
Luckily, you don’t! Instead of relying on a 1099 form, you can find out how much money you made through Shopify by looking up your transaction history.
Finding out how much you earned through Shopify without a 1099-K
Here’s the easiest way to to pull your transaction history, directly from the platform:
- Log into your Shopify admin and select Settings > Payment providers > Shopify Payments > View Payouts > Transactions
- Export your transactions for the year. (When you're selecting your date range, you might want to consider adding a few days on both ends of the year to make sure you don’t miss anything)
- In your export, sort your transactions based on column H, or “Available on.” (This is the date when the payment went from the customer's bank to your account)
- Delete any rows where the “Available on” date is outside of the year you’re filing for
- Sort your spreadsheet by column B, or “Type”
- Delete rows where the “Type” is anything other than “Charge”
- Determine the total sum of column I or “Amount”
You’ll end up with the total amount you earned through Shopify.
Note: If you do receive a 1099-K, you can still follow the above steps to double-check the amount listed on your form!
Now that you can figure out how much you earned from Shopify payments, let’s talk about the forms you’ll need to complete when you file your taxes.
{email_capture}
What forms do you need to file your Shopify 1099 taxes?
There are three main forms you fill out when you file your taxes:
- Schedule C, where you report your gross business income and expenses
- Schedule SE, where you calculate your self-employment taxes
- Form 1040, where you report your taxable income and all calculate your taxes (including the income taxes you pay on top of self-employment taxes)
To fill out your Schedule C, you’ll need some information:
- Your “cost of goods sold” (COGS)
- Your other business expenses
You can use these to save on your tax bill. You might even end up with a business loss.
That’s because you don’t get taxed on your gross income — the amount of money that actually flows in from Shopify and your other payment methods. To find your taxable income, you can subtract your business expenses — everything you spend to run your store:
- Gross income: Everything you earned in a calendar year
- Taxable income: Your gross income, minus your business expenses
Let’s go over how to find your business expenses, starting with cost of goods sold.
How to deal with your “cost of goods sold”
For Shopify businesses, the biggest chunk of your business expenses will probably come from “cost of goods sold,” or COGS.
What is “cost of goods sold”?
Cost of goods sold is what you spend directly on making or buying the goods your business sells. This might mean:
- 👷♀️ Labor: Like paying people to assemble your product
- 🧰 Materials: Like the cost of parts — or the items themselves, if you’re a reseller
- 💡 Operations: Costs directly related to production or wholesale, like software or rent for a manufacturing space
Note: COGS typically only apply to businesses that sell products (including digital ones). Businesses that sell services usually don’t need to deal with COGS. So if you’re a service business on Shopify, feel free to skip ahead to the section on common tax write-offs!
How to calculate your Shopify COGS
The formula to calculate your COGS is:
(Beginning Inventory + Purchases) - Ending Inventory = COGS
Let’s break down what each of these means:
- Beginning Inventory: The total value of your existing inventory at the start of the fiscal year. This number should match your ending inventory from the previous year. (Or, if you’re a newly launched business, the number might be zero)
- Cost of Purchases: The total value of all the direct expenses of making your product, including labor, materials, and operations
- Ending Inventory: The total value of the inventory you haven’t sold by the end of the year
The COGS calculation in action
Let’s say you sell handmade jewelry through Shopify:
- At the start of the year, your beginning inventory includes $1,000 worth of unsold jewelry
- During the year, you spend $2,000 on supplies to make new necklaces
- By the end of the year, you have $500 of unsold jewelry.
Here’s how your COGS calculation works:
Ultimately, your COGS would be $2,000.
How to track your COGS-related purchases
To write off COGS, you’ll need to keep track of your related costs throughout the year.
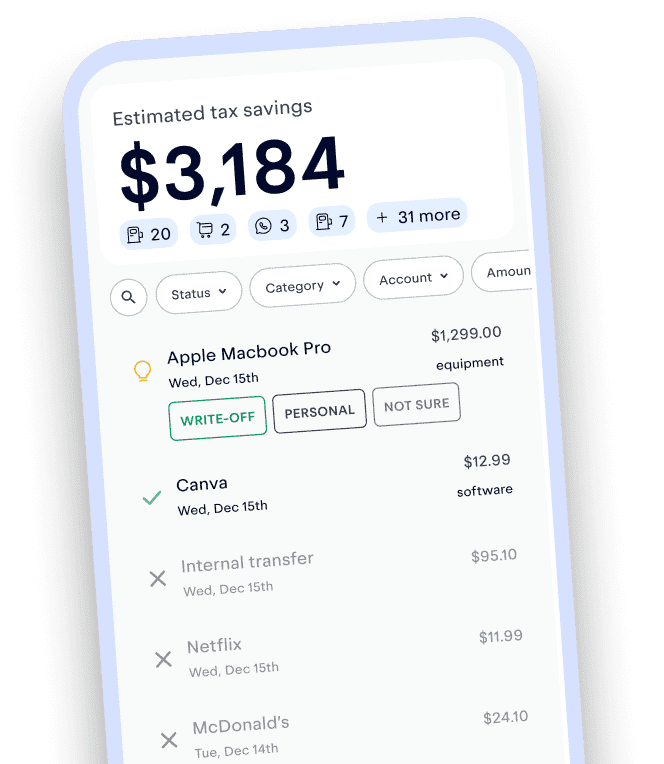
One way to do this? Use the Keeper app, a business expense tracker. Download the app, and it’ll automatically track the money you spend on making or sourcing goods.
{upsell_block}
When it’s time to file your taxes (and calculate COGS), you’ll have expense reports all ready to go.
If any hiccups come up while you’re learning the ropes — for instance, if you’ve got more COGS-related questions — you can chat with us for individual support!
How to deal with COGS as a small business owner
For bigger stores, COGS goes hand-in-hand with inventory valuation — a whole complicated area of accounting that involves looking at what you have on hand, but haven’t sold yet. But do you actually have to deal with this?
According to the IRS's tax rules, probably not!
“Small business taxpayers” — those who averaged $26 million or less in gross receipts over the past three years — don’t need to report the value of their inventory when they file taxes.
As far as COGS go, you can just:
- Write off your exact production costs for the year, just like your other business expenses
- Skip tracking the value of your inventory
It’s simple. If you spent $5,000 buying materials for your costume jewelry business, just take a $5,000 write-off. And feel free to jump ahead to the section on non-COGS write-offs!
What to do if you are keeping inventory
If you happen to be running a huge ecommerce business, there are a few different accounting methods you can use to calculate its value, including:
- First in, first out: Assuming that the items you buy or make first are sold first
- Last in, first out: Assuming that the items you bought or made most recently are sold first
- Average cost per unit: Using the average cost of all your inventory, regardless of when you acquired each piece
Read more about which option would work best for you in this Shopify post.
Common tax write-offs for Shopify businesses
While COGS is a big part of the write-offs you can take, it’s not the only business expense you should be tracking.
Chances are, you’ll have other write-offs in addition to expenses related to making or buying your products. Common expenses outside of COGS include:
- 🏠 The home office deduction
- 💻 Your computer
- 📞 A portion of your phone bill
- ⚡ A portion of your Wi-Fi bill
- 🛍️ Merchant seller fees
- 🚗 Vehicle expenses, if used for work
- 🏦 Business loan interest
- 👩⚖️ Professional services like legal advice and consulting
- 🏫 Education expenses like courses, conferences, and webinars
- ✈️ Business-related travel
- 📰 Marketing fees
- 🍔 Business-related meals, like with suppliers
- 🌐 Website costs, like web design, logo design, and hosting fees — including Shopify fees, if you use it as a CMS
- 💵 Payment processor fees — including Shopify fees
Take a look at our full list of write-offs for online store owners!
What to do if you lose money selling on Shopify
It's not uncommon for Shopify sellers' costs to exceed their income in the first few years of the business. It can take a while for your project to get off the ground! Luckily, a business loss will have a positive effect on your taxes.
If your Shopify business is your sole source of income, you won't have to pay taxes for the year you incurred the business loss. If you have a day job and Shopify is your side hustle, you can save on your taxes for the year you took the business loss. Here's how: Subtract the amount of your business loss from your taxable income from your day job. After all, if you made $50,000 at your day job but lost $3,000 on your side hustle business, you shouldn't be taxed on $50,000 — effectively, you made $47,000 and should be taxed on that amount.
Writing off your Shopify fees
A couple of write-offs on that list deserves a little extra attention: your Shopify fees.
That’s right! You can write off the money you spend on Shopify, including both:
- ✓ The monthly plan
- ✓ The separate transaction fees
Whether you’re on a lightweight Shopify Basic plan, or paying quadruple digits every month for Shopify Plus, don’t forget to write off that expense. It’s a key part of what you pay to keep your store up and running.
If you want to claim expenses like your Shopify account, you’ll need to keep track of what you’re spending on them.
As mentioned, Keeper can help with this by organizing your business's expenses in real-time.That way, you don't have to worry about losing your receipts and missing out on write-offs, when it's time to fill out your Schedule C.
{write_off_block}
Speaking of which…
How to fill out your Schedule C with Shopify business expenses
When you file your taxes, Schedule C is the form you use to list all of your COGS and other business expenses. By the end of this form, you’ll have your taxable income figured out.
We’ve got an article that provides a step-by-step breakdown of how to fill out your Schedule C. But let’s quickly cover the parts where you enter your COGS and other expenses.
Non-COGS business expenses: Part 2 of Schedule C
This is where you’ll enter in any costs that are directly related to running your business.
Your Shopify fees go here. Put them in Box 10, for “Commissions and fees.”

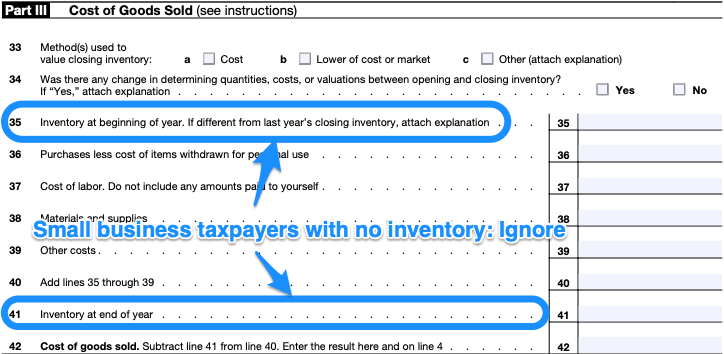
Cost of goods sold: Part 3 of Schedule C
Here’s where you’ll list costs directly spent on making or buying your products.
- Line 33: For most taxpayers, the method used will be “cost”
- Line 34: This is asking if you’ve changed the way you track or value inventory throughout the year. (Most people don’t, but if you have, you’ll need to fill out Form 3115)
- Line 35: The value of your inventory at the start of the tax year
- Line 36: The cost of the products you sold (if you were reselling), or the cost of the raw materials you used to make them
- Line 37: The amount you spent on paying people to manufacture your products
- Line 38: The amount you spent on tools, supplies, or parts used to create your product. There can be some overlap with the category in line 36 — just make sure you don’t double-count anything
- Line 39: Any other money you spent to directly support the production of your goods, like rent and utilities for a manufacturing space
- Line 40: This is the first part of the COGS formula: your inventory at the start of the year, plus all purchases
- Line 41: The value of your inventory at the end of the tax year
- Line 42: This is your total cost of goods sold
How to fill in your COGS as a small business taxpayer
As we’ve learned, there are different rules for small business taxpayers, since you can opt out of tracking inventory. But you can still record your production costs in the lines above.
The only difference: You won’t record starting inventory (line 35) or your ending inventory (line 41).

Your “cost of goods sold” will be what you actually spent on making or sourcing your products.
How to finish up your Shopify taxes
When you’re finished with Schedule C, you can:
- Fill out your Schedule SE to calculate your self-employment tax
- Complete your Form 1040 as usual
Get detailed instructions in our guide to completing your self-employment taxes here!
If you’re launching a new business on Shopify, you might feel overwhelmed by the prospect of filing 1099 taxes. Take heart: the learning curve for Shopify taxes may be a little steep the first time around. But it’s simpler when you break things down.
And if you decide you’d rather spend more time growing your business and less time tussling with the IRS, consider using Keeper to take care of the process for you.
{filing_upsell_block}

File complex taxes confidently
Upload your tax forms and Keeper will prep your return for you. 100% accuracy and maximum refund guaranteed. Plus, a tax pro reviews and signs every return.

Sign up for Tax University
Get the tax info they should have taught us in school

Expense tracking has never been easier
Keeper is the top-rated all-in-one business expense tracker, tax filing service, and personal accountant.

What tax write-offs can I claim?
At Keeper, we’re on a mission to help people overcome the complexity of taxes. We’ve provided this information for educational purposes, and it does not constitute tax, legal, or accounting advice. If you would like a tax expert to clarify it for you, feel free to sign up for Keeper. You may also email support@keepertax.com with your questions.


